Thursday 22 August 2013

The User Profile Service failed the logon error message - Vista

                  My title When you log on to a Windows 7-based or a Windows Vista-based computer by using a temporary profile, you receive the following error message:
The User Profile Service failed the logon. User profile cannot be loaded.

                Occasionally, Windows might not read your user profile correctly, such as if your antivirus software is scanning your computer while you try to log on. Before you follow the methods here, try restarting your computer and logging on with your user account again to resolve the issue. If you restart your computer and it does not resolve this issue, use the following methods to resolve this issue.

              You must be able to log on to an administrator account to fix your user profile or copy your data to a new account. Before you resolve the issue, log on to Windows by using another account that has administrative permissions, or restart in safe mode to log on with the built-in administrator account.

To enable in-built administrator account start your computer in Safe mode with command prompt.
On the command Windows type "net user administrator /active:yes" and press enter. You will get command completed successfully message. Now, restart your computer and log in with Administrator user account. 

Method 1: Fix the user account profile

Take the back up of your registry, then proceed with the steps. 

  1. Click Start, type regedit in the Search box, and then press ENTER.
  2. In Registry Editor, locate and then click the following registry subkey:
    HKEY_LOCAL_MACHINE\SOFTWARE\Microsoft\Windows NT\CurrentVersion\ProfileList
  3. In the navigation pane, locate the folder that begins with S-1-5 (SID key) followed by a long number.
  4. Click each S-1-5 folder, locate the ProfileImagePath entry in the details pane, and then double-click to make sure that this is the user account profile that has the error.

    • If you have two folders starting with S-1-5 followed by some long numbers and one of them ended with .bak, you have to rename the .bak folder. To do this, follow these steps:
      1. Right-click the folder without .bak, and then click Rename. Type .ba, and then press ENTER.
      2. Right-click the folder that is named .bak, and then click Rename. Remove .bak at the end of the folder name, and then press ENTER.
      3. Right-click the folder that is named .ba, and then click Rename. Change the .ba to .bak at the end of the folder name, and then press ENTER.
    • If you have only one folder starting with S-1-5 that is followed by long numbers and ends with .bak. Right-click the folder, and then click Rename. Remove .bak at the end of the folder name, and then press ENTER.
    • If you have two folders starting with S-1-5 followed by some long numbers and one of them ended with .bak, you have to rename the .bak folder. To do this, follow these steps:
      1. Right-click the folder without .bak, and then click Rename. Type .ba, and then press ENTER.
      2. Right-click the folder that is named .bak, and then click Rename. Remove .bak at the end of the folder name, and then press ENTER.
      3. Right-click the folder that is named .ba, and then click Rename. Change the .ba to .bak at the end of the folder name, and then press ENTER.
    • If you have only one folder starting with S-1-5 that is followed by long numbers and ends with .bak. Right-click the folder, and then click Rename. Remove .bak at the end of the folder name, and then press ENTER.
  5. Double-click the folder without .bak in the details pane, double-click RefCount, type 0, and then click OK.
  6. Click the folder without .bak, in the details pane, double-click State, type 0, and then click OK.
  7. Close Registry Editor.
  8. Restart the computer.
  9. Log on again with your account.

Method 2: Log on to Windows and copy your data to a new account

Create a new account and copy the data from the old account to the new account.

Occasionally, Windows might not read your user profile correctly—for example, if your antivirus software is scanning your computer while you try to log on. Before you create a new user profile, try restarting your computer and logging on with your user account again.

To create a new user profile

To create a new profile, you must first create a new user account. When the account is created, a profile will also be created.
  1. Open User Accounts by clicking the Start button Picture of the Start button, clicking Control Panel, clicking User Accounts and Family Safety (or clicking User Accounts, if you are connected to a network domain), and then clicking User Accounts.
  2. Click Manage another account. Administrator permission required If you are prompted for an administrator password or confirmation, type the password or provide confirmation.
  3. Click Create a new account.
  4. Type the name you want to give the user account, click an account type, and then click Create Account.

To copy files to the new user profile

After you create the profile, you can copy the files from the existing profile. You must have at least three user accounts on the computer to complete these steps, including the new account you just created.
  1. Log on as a user other than the new user you just created or the user that you want to copy files from.
  2. Open Documents by clicking the Start button Picture of the Start button, and then clicking Documents.
  3. Click the Tools menu, and then click Folder Options.
    If you don't see the Tools menu, press ALT.
  4. Click the View tab, click Show hidden files and folders, clear the Hide protected operating system files check box, and then click OK.
  5. Locate the C:\Users\Old_Username folder, where C is the drive that Windows is installed, and Old_Username is the name of the profile you want to copy files from.
  6. Select all of the files and folders in this folder, except the following files:
    • Ntuser.dat
    • Ntuser.dat.log
    • Ntuser.ini
  7. Click the Edit menu, and then click Copy.
    If you don't see the Edit menu, press ALT.
  8. Locate the C:\Users\New_Username folder, where C is the drive that Windows is installed, and New_Username is the name of the new user profile you created.
  9. Click the Edit menu, and then click Paste.
    If you don't see the Edit menu, press ALT.
  10. Log off, and then log back on as the new user.
    If you have e-mail messages in an e-mail program, such as Windows Mail, you must import your e-mail messages and addresses to the new user profile before you delete the old profile. If everything is working properly, you can delete the old profile.


Help us to improve


Wednesday 21 August 2013

Security Center Service Can not be started in Windows 7/Vista

   We usually face this problem in Windows 7 or Vista operating system. We get a action center flag notification that your security center is turned off. When you try to turn on the security center, you will get a message that security center service cannot be started. This problem occurs when your security center service is not started with automatic start up type or when security center service is missing. When we install the update and reboot the system before the updates are configured properly or when we have malware threat in our computer the security center service may be removed. Here we go with the troubleshooting steps.

Step 1: Check whether security center service is started with automatic start up type.


 https://mail-attachment.googleusercontent.com/attachment/?ui=2&ik=3d238882a2&view=att&th=140a0e7e4b22a3f1&attid=0.1&disp=inline&realattid=f_hkmj9zsz0&safe=1&zw&saduie=AG9B_P9WeSixXN_qNYW5titwwpap&sadet=1377089115380&sads=sF3hWJMTWTBkOmKdQrAbWsNKPEo&sadssc=1

Also check whether the dependency services are started on the dependency tab. 

Step 2 : If the security center service is  missing, try to Run System file checker scan.
Open a Command window as a Administrator and type sfc /scannow.  This will repair system files if they corrupted. IF there are corrupted files found reboot your computer to fix the corrupted files.

Check whether the Security center service is available on services window. If the service is still missing go through with next step.

Step 3 : Scan the computer with free scanner.

You can scan with Superantispyware, 
Scan with Malwarebytes
Scan with Hitmanpro 

If the malware threat(Trojan)is found reboot your computer and check the security center services.
If no, go through with the next step.3

Step 4 : In this step we need to add missing Security center services registry keys. Before that back up your registry. After the back up, download the Security center registry fix from the following link
http://www.winhelponline.com/temp/w7-wscsvc.zip

Add the registry key in your registry and reboot your computer. Once the reboot process complete go to services windows and check whether Security center service is present. If so, check that Security center services is started with automatic start up type. Start the services and check your action center to configure your security center.


Hope this will Help!!!!


Help us to improve


Thursday 15 August 2013

How to Reset forgotten user account login password using Windows disk

               
                We usually come across this problem, when we dont use our PC that much especially old people.You might have been told to use a password reset disk or another admin account to reset a forgotten Windows 7 password. But for most users, these are unless when they get the Windows password forgotten.Here we go with the easiest way to reset our user account password.


Reset Your Windows Password Using the Command Prompt

1. Boot your computer using your Windows installation disc.

2. Wait for the setup files to load, and select your language. Click Next.

3. Click the Repair your computer link on the Install Windows screen.

4. Select the operating system to repair, and note the drive letter on which the OS is installed (it is probably C: or D:). Click Next.

5. Click Command Prompt at the bottom of the list of recovery tools.

Now you need to overwrite the Sticky Keys executable with the Command Prompt executable. Sticky Keys is an accessibility feature that allows a user to tap the Shift, Ctrl, Alt, or Windows key once to achieve the same effect as holding the key down. Ordinarily, tapping Shift five times activates Sticky Keys--but with this trick, you are going to make tapping Shift five times activate the Windows Command Prompt instead.

The instructions below use drive letter C: as an example. If your operating system is installed on another drive, replace C: with the appropriate drive letter.

1. In the Command Prompt window, type copy c:\windows\system32\sethc.exe c:\ and press Enter.

2. Type copy /y c:\windows\system32\cmd.exe c:\windows\system32\sethc.exe and press Enter.

3. Exit the Command Prompt and reboot the computer. At the login screen, tap Shift five times. The Command Prompt will pop up.

4. Type net user username password, replacing username with your username and password with a new password.

5. Exit the Command Prompt, and log in using your new password.

To prevent another user from exploiting the same trick to reset your password, you can restore Sticky Keys as follows:

1. Step through the instructions above to boot the PC using your Windows installation disc, open the recovery tools, and launch the Command Prompt.

2. Type copy /y c:\sethc.exe c:\windows\system32\sethc.exe and press Enter.

3. Exit the Command Prompt and reboot the computer. Pressing Shift five times will now activate Sticky Keys instead of the Command Prompt. Store your Windows installation disc in a secure location.

Help us to improve

Tuesday 13 August 2013

How to boot Windows 8 in Safe mode

            We used to tap F8 key to start the Windows XP/Vista/7 operating systems to boot into safe mode. Where as in Windows 8 booting option to safe mode has been changed. You can still have Safe Mode, however, it is buried deep into the recovery options of Windows 8. While just mashing the F8 key as we all know will boot you into automatic recovery mode, you can still manually access the recovery options by pressing the Shift+F8 key combination. Here we go with the safe mode booting option in Windows 8.


Step 1 :   The trick is to hold the Shift button and mash the F8 key, this will sometimes boot you into the new advanced “recovery mode”,  where you can choose to see advanced repair options.


You will need to click on the Troubleshoot option.


 Now select Advanced Options.


Now choose the Windows Startup Settings option, by the looks of things we were never meant to find Safe Mode.


 Finally hit the Restart button.


Like magic, when your PC reboots you will be able to boot into Safe Mode from the familiar looking Advanced Boot Options screen.


Getting To Safe Mode From Within Windows 8

 You have a second option, however, this requires you to be booted into Windows already. Press the Win+R key combination and type msconfig in the run box and hit enter.


Switch over to the boot tab, and click on the Safe Boot check box..


You can also choose the type of Safe Mode you want to boot into:
  • Minimal is normal safe mode.
  • Alternate Shell is safe mode with command prompt
  • Network is safe mode with networking.
The Active Directory option pertains to restoring a server that is a Domain Controller for your network. Once you have chosen your option click the ok button and restart your machine.


You PC will be booted into Safe Mode automatically.


If you restart you PC you will just keep getting booted into Safe Mode, to stop this open msconfig again and uncheck the Safe Boot option, then hit the ok button.


Finally Restart your Machine.


Hope, this will help.

Help us to improve


CD/DVD drive is missing

         Your CD drive or DVD drive is missing or not recognized by Windows or other programs, so you cannot play or access a CD or DVD. This issue might have occurred after you installed, uninstalled, or updated a program. This issue commonly occur in all desktop and laptops. You can't see the CD/DVD drive on the My computer or the inserted CD/DVD disc will not auto play.


How to fix this?

Manual method : You can fix this issue by removing upper and lower registry keys associated with CD/DVD drive.

Step 1 : Perform registry back up. Open Registry editor. From Run command type regedit then press OK.
From the File menu->click Export -> now name the Registry back up and save it in your local drive.
Registry back up is recommended before making any registry key changes.

Step 2 : Locate the following registry key. Navigate to the exact location

HKEY_LOCAL_MACHINE\SYSTEM\CurrentControlSet\Control\Class\{4D36E965-E325-11CE-BFC1-08002BE10318}


Now, you  will see the the Upperfilter and lowerfilter registry key entries on the right side pane. Click on the registry keys and right click and delete the both registry keys. Some cases any one of the registry key will present either Upperfilter or Lowerfilter registry keys. remove any filters comes in the name of upper and lower filter.

Now, reboot your computer and try to access the CD/DVD drive from My computer.

Automatic Fix : You can run the following Microsoft fixit to fix the CD?DVD drive missing problem.

To download Microsoft fixit click here

After running the fixit you need to reboot your computer to access your CD/DVD drive.

Step 3 : In some cases, the CD/DVD drive is not named in disk management. In that case, type diskmgmt.msc commend from Run window. You will see the hard drive and CD/DVD drive installed on your computer. See whether your CD/DVD drive is named like D or E or F or G depends on how much partition you have in your hard drive. If it is not named, please name it with any Alphabet.

Now, try to access your CD/DVD drive.

Step 4 : If the CD/DVD driver is corrupted, you can also experience this problem. In that case, uninstall the CD/DVD drive from device manger. To access device manager, type devmgmt.msc from Run commend. Locate CD/DVD drive. Right click and click on uninstall option. Then reboot your computer. Once the driver is installed successfully after reboot, try to access your CD/DVD drive.

If you are still unable to access your CD/DVD drive, this might be problem with CD/DVD hard drive.


Help us to improve

Monday 12 August 2013

Object error in Internet explorer

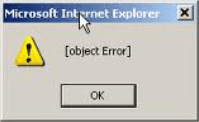
          When you try to access Internet explorer, you will get a small pop up windows stating that "object error". You may face difficulty to access your Internet explorer. This problem occur because of tool bars and add-ons installed in your computer. Here we go with the troubleshooting steps.

                                       object error in IE

Step 1 : Try to open your Internet explorer in Safe mode or without add-on mode. From Run command type iexplore /a or iexplore -extoff and click OK. Now try to access your webpages. If it works, you can just disable the add-ons to fix this issue.

How to disable add-ons in Internet explorer. From Internet explorer  tools->Internet options-> Programs -> Manage addons->Toolbars and Extensions. Choose the unwanted toolbars and disable them.

Step 2 : Try to reset your Internet explorer, type inetcpl.cpl from Run command. The Internet options window will open. Now, go to Advanced tab, where you can see the Reset option.

Step 3 : Open a run command and type appwiz.cpl.

You can see the installed application list on your computer. Please remove/uninstall the listed toolbars from the installed program list.

Babylon search
Coupon amazing
default tab
default tab for chrome
We-care toolbar
 Delta toolbar
Price peep
search-conduit
Yontoo toolbar
Unfriend checker
Atom toolbar etc.,

Make sure all the Internet browsers are closed before uninstalling any toolbars so that the uninstallation will proceed. 


Step 4 : After removing the toolbars it is recommended to run the spyware scan.

Run any virus scan like malware, super anti spyware.

Download Malwarebytes

Download Superantispyware

Restart your computer and experience your browsing session.

Hope this will work!!!

Help us to improve

Wednesday 7 August 2013

How to Install Windows 7 OS


           Windows 7 Operating system step by step installation procedure. You may want to install Windows 7 operating system. You must have Windows 7 installation disc and product key to continue with installation or re-installation. Your computer must contain CD/DVD drive to continue with disc installation. Here we go with the installation steps.


Step 1 : Insert a Windows 7 installation disc on your DVD drive. Reboot your computer now.
Once the restart complete, you will get a black screen to press any key to continue with the installation.

If you are installing the Operating system first time your computer needs to be configured to boot from DVD. This is done via BIOS. On most computers, the BIOS menu can be accessed by pressing either the F2 or Del keys while the machine is booting.

BIOS

Step 2 : Once you have completed this stage, Windows 7 will start loading. If you see the below image, you're doing well so far.

Starting

After a few moments, you will reach the installation menu. Your first step is to choose the language and the keyboard.

Begin

You will be now taken to the Install now menu. We have already prepared for the installation, so you can click Install now and proceed.
Install now


The next step is to accept the license agreement.


License


After this, you will have to decide whether you want to Upgrade an existing installation or perform a Custom (advanced) installation, which is basically creating a new copy of Windows.

You can choose upgrade option in case if you are going to repair your operating system.

In case of fresh installation or re-installation, you need to choose Custom(Advanced) option to continue with installation.
 
Type


Step 3 : Once you choose the custom option the Partition window will open where you need to install your OS, usually we choose C drive to install the operating system. In this step you can also partition your Hard drive. If you have only once Partition, you can create new Partition by choosing Driver option.

Your hard drive should have minimum of 16 GB to continue with Windows 7 installation and install other programs. Minimum RAM requirement is 1GB.


Where


Once you choose the drive in which you want to install the the OS click on next option. If you are having operating system installed in your operating system and now you are trying to reinstall the old application and files will be saved as Windows.old. If you don't have enough space on your hard drive, the disc will format the C drive to continue with the installation process.

Step 4 : Once your partition is ready , If you're comfortable with your setup, highlight the created partition and click Next. Windows 7 will be installed to this partition. Depending on your hardware, this can take some time. My testing shows approx. 30-40 minutes.

System partition

Highlight the created partition and click Next.

Installing

During the installation, your computer may restart several times. Let it be.  Please don't interrupt the installation process.


Step 5 :  Once the installation complete, you need to choose your computer name, whether you need password for your user account and need to provide Windows 7 key to activate your OS.

Username

Password


Windows 7 activation

Activation

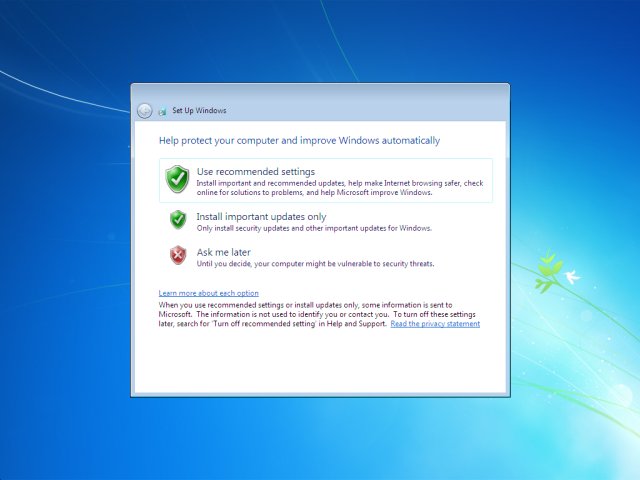
Choose the update option.


Updates


Set your Time and time zone

Time zone

Choose your network location in case if you have internet connection

Location


Now, you are good to go with your fresh operating system. Your Windows 7 PC is ready.

Windows 7 installation is simple to proceed comparing with Windows XP operating system.
Hope, this will work for you also
Help us to improve